Chocolate Mousse
Introduction :
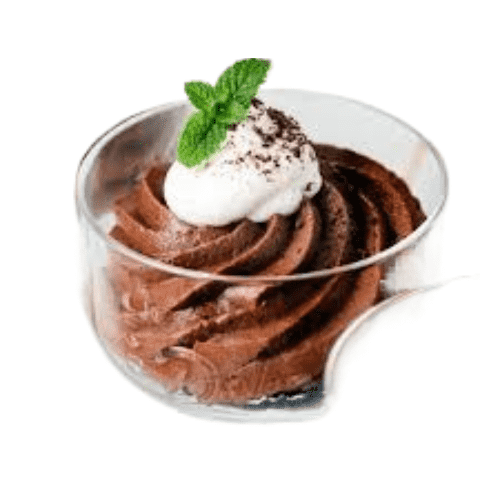
Chocolate mousse is a classic French dessert that has gained popularity worldwide due to its rich, velvety texture and decadent flavor. This airy and light dessert is perfect for any occasion, be it a fancy dinner party or a cozy night in. In this blog, we will dive deep into the world of chocolate mousse, exploring its history, the science behind its luscious texture, and a detailed step-by-step recipe that will guide you to create the perfect chocolate mousse at home.
History of Chocolate Mousse :
The term “mousse” is inferred from the French word for “froth,” which flawlessly depicts the light and vaporous surface of this dessert.
The origins of chocolate mousse can be traced back to the 18th century in France, where it was originally served as a savory dish. It wasn’t until the 19th century that sweet versions of mousse, including chocolate mousse, became popular.
The exact creator of chocolate mousse is unknown, but it is believed to have been a result of the increasing popularity of chocolate in Europe. As chocolate became more accessible and affordable, chefs and home cooks alike began experimenting with it, leading to the creation of numerous chocolate desserts, including the beloved chocolate mousse.
The Science Behind Chocolate Mousse :
Understanding the science behind chocolate mousse is key to mastering its preparation. The light and airy texture of mousse is achieved through the incorporation of air into the mixture. This is typically done by whipping cream or egg whites to incorporate air, which is then folded into the chocolate mixture.
Whipped Cream vs. Whipped Egg Whites: Traditional chocolate mousse recipes often use either whipped cream or whipped egg whites to achieve the desired texture. Whipped cream provides a richer and creamier texture, while whipped egg whites result in a lighter and airier mousse. Some recipes use a combination of both to balance the texture and flavor.
Emulsification: The prepare of combining the chocolate with the whipped component includes emulsification. This is the process where two immiscible liquids (in this case, melted chocolate and whipped cream or egg whites) are combined to form a stable mixture. The key to successful emulsification is to gently fold the whipped component into the chocolate mixture to avoid deflating the air bubbles.
Temperature Control: Temperature plays a crucial role in the preparation of chocolate mousse. The melted chocolate should be warm enough to blend smoothly with the other ingredients but not so hot that it causes the whipped component to deflate. Similarly, the whipped cream or egg whites should be at the right consistency to hold their shape when folded into the chocolate mixture.
Essential Ingredients for Chocolate Mousse :
To make the culminate chocolate mousse, it is fundamental to utilize high-quality fixings. Here is a list of the key ingredients you will require:
Chocolate: The star fixing of chocolate mousse is, of course, chocolate. Use high-quality dark chocolate with a cocoa content of at least 70% for a rich and intense flavor. Avoid using milk chocolate as it will result in a much sweeter mousse.
Cream: Heavy cream or whipping cream is used to add richness and creaminess to the mousse. Ensure that the cream is fresh and has a high-fat content (at least 35%) to achieve the best results.
Eggs: Eggs are used to add structure and stability to the mousse. Some recipes call for the use of both egg yolks and egg whites, while others use only one component. Ensure that the eggs are fresh and at room temperature for easy blending.
Sugar: A small amount of sugar is added to balance the bitterness of the dark chocolate and to sweeten the mousse. Use fine granulated sugar for easy dissolution.
Butter: Adding a small amount of butter to the melted chocolate helps to create a smooth and glossy texture.
Flavorings: Optional flavorings such as vanilla extract, coffee, or liqueurs can be added to enhance the flavor of the mousse.
Equipment Needed :
Having the right equipment is essential for the successful preparation of chocolate mousse. Here is a list of the equipment you will require:
- Double Boiler or Heatproof Bowl and Saucepan: To melt the chocolate gently without burning it.
- Mixing Bowls: For mixing the various components of the mousse.
- Whisk or Electric Mixer: To whip the cream or egg whites to the desired consistency.
- Spatula: For folding the whipped component into the chocolate mixture.
- Serving Dishes: Small ramekins, glasses, or bowls for serving the mousse.
Step-by-Step Recipe for Chocolate Mousse :
Now that we have covered the essentials, let’s move on to the detailed step-by-step recipe for making chocolate mousse. This recipe yields approximately 6 servings.
Ingredients :
- 200 grams (7 ounces) of high-quality dark chocolate (70% cocoa)
- 3 large eggs, separated
- 1/4 cup granulated sugar
- 1 cup heavy cream (35% fat)
- 2 tablespoons unsalted butter
- 1 teaspoon vanilla extract (optional)
- Pinch of salt
Instructions :
Prepare the Chocolate :
Chop the dark chocolate into small pieces and place them in a heatproof bowl.
Set the bowl over a saucepan of simmering water (double boiler method) and stir until the chocolate is completely melted and smooth.
Remove the bowl from the heat and stir in the butter until fully incorporated.
Let the chocolate mixture cool slightly while you prepare the other components.
Whip the Egg Whites :
Whip the Egg Whites:
In a clean blending bowl, include the egg whites and a squeeze of salt.
Using a whisk or an electric mixer, whip the egg whites until they form soft peaks.
Gradually add half of the granulated sugar while continuing to whip until the egg whites form stiff peaks.
Set aside.
Whip the Egg Yolks :
In another mixing bowl, add the egg yolks and the remaining sugar.
Whisk until the mixture becomes pale and creamy.
If utilizing, include the vanilla extricate and whisk to combine.
Whip the Cream:
In a partitioned blending bowl, include the overwhelming cream.
Using a whisk or an electric mixer, whip the cream until it forms soft peaks.
Be careful not to over-whip the cream, as it can turn into butter.
Combine the Ingredients :
Gently fold the whipped egg yolks into the melted chocolate mixture until fully incorporated.
Next, fold in the whipped egg whites in three additions, being careful not to deflate the mixture.
Finally, fold in the whipped cream in two additions, ensuring that the mixture remains light and airy.
Chill the Mousse:
Spoon the chocolate mousse into person serving dishes.
Cover the dishes with plastic wrap and refrigerate for at slightest 2 hours, or until the mousse is set.
Serve:
Before serving, you can garnish the chocolate mousse with whipped cream, chocolate shavings, or fresh berries if desired.
Serve chilled and enjoy!
Tips and Tricks for Perfect Chocolate Mousse :
- Use High-Quality Chocolate: The quality of the chocolate you use will directly affect the flavor of your mousse. Invest in good-quality dark chocolate with a high cocoa content for the best results.
- Temperature Control: Ensure that the melted chocolate is not too hot when folding in the whipped components. If the chocolate is too hot, it can cause the whipped cream or egg whites to deflate.
- Gentle Folding: When incorporating the whipped cream or egg whites into the chocolate mixture, use a gentle folding motion to preserve the airiness of the mousse.
- Room Temperature Ingredients: Use room temperature eggs to ensure they blend smoothly into the chocolate mixture.
- Chilling Time: Allow the mousse to chill in the refrigerator for at least 2 hours before serving to ensure it is properly set.
Variations of Chocolate Mousse :
Chocolate mousse is a versatile dessert that can be customized with various flavors and ingredients. Here are a few variations to try:
- Coffee Chocolate Mousse: Add a tablespoon of instant coffee granules to the melted chocolate for a mocha-flavored mousse.
- Orange Chocolate Mousse: Add a tablespoon of orange zest or a splash of orange liqueur to the chocolate mixture for a citrusy twist.
- Mint Chocolate Mousse: Add a few drops of peppermint extract to the chocolate mixture for a refreshing mint-flavored mousse.
- Spiced Chocolate Mousse: Add a pinch of ground cinnamon or chili powder to the chocolate mixture for a warm and spicy kick.
- Nutty Chocolate Mousse: Fold in some chopped nuts, such as hazelnuts or almonds, for added texture and flavor.
Frequently Asked Questions (FAQs)
Q1: Can I make chocolate mousse without eggs?
A1: Yes, you can make chocolate mousse without eggs by using whipped cream or a combination of whipped cream and gelatin to achieve the desired texture. This will result in a slightly different texture but will still be delicious.
Q2: Can I utilize drain chocolate instep of dull chocolate?
A2: While you can use milk chocolate, the mousse will be much sweeter and less intense in flavor. Dark chocolate is recommended for a rich and decadent mousse.
Q3: How long can I store chocolate mousse in the refrigerator?
A3: Chocolate mousse can be put away in the fridge for up to 3 days. Cover the serving dishes with plastic wrap to prevent the mousse from absorbing any odors from the fridge.
Q4: Can I freeze chocolate mousse?
A4: Freezing chocolate mousse is not recommended as it can affect the texture. The mousse may become grainy once thawed.
Q5: What can I serve with chocolate mousse?
A5: Chocolate mousse pairs well with various toppings and accompaniments, such as whipped cream, fresh berries, chocolate shavings, or a drizzle of caramel or fruit sauce.
Conclusion :
Chocolate mousse is a timeless dessert that never fails to impress with its rich flavor and luxurious texture. By following this detailed step-by-step recipe and understanding the science behind its preparation, you can create a perfect chocolate mousse that will delight your taste buds and impress your guests. Whether you stick to the classic version or experiment with different flavors and variations, chocolate mousse is sure to become a favorite in your dessert repertoire. Enjoy!
